

norbury.brook
-
Posts
94 -
Joined
-
Last visited
Everything posted by norbury.brook
-
https://connect.mazda.com/en/support/gracenote_update/
-
8. Press the 'Return' arrow BUTTON on the screen many times to go back to the top page of the Factory/Service Inspection screen. From there, scroll down and choose "End Diag Mode" to get back to the Normal Screen. WRITING TO POST TO THIS FORUM TOPIC....
-
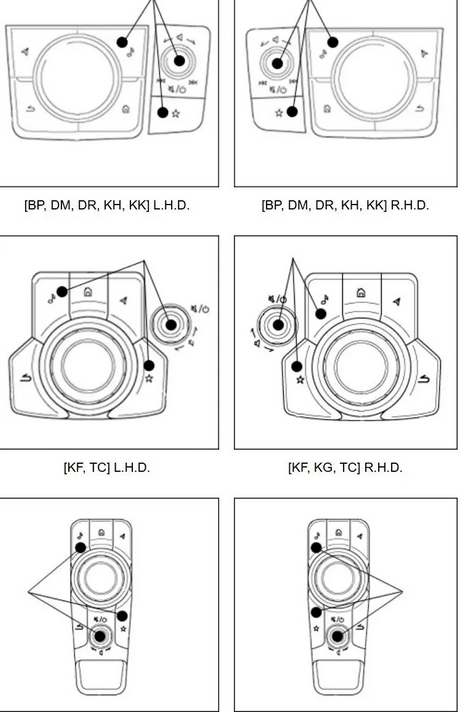
To Replace the firmware update in your Mazda correctly, you must first reveal the whole version numbers on the screen below. 1. Push the start button (with the radio turned on) to activate the ignition or ACC. 2. Keep pushing the volume mute button simultaneously. The "Diagnostic Test" screen will display when you simultaneously push the Music and Favourite buttons for three to five seconds. 3. Use the Commander Knob to scroll up or down the list on the screen, as shown by the orange highlighted items. 4. Press the Commander Knob once to bring up the screen, and then choose the orange "Service Information" option. 5. From the screen, choose "Connected Device Information" (orange). Next, find the orange "CMU" option and click on it. 7. The screen labelled "Device Version Information CMU" follows. View the ECU software number '7000C0A-NA11_10008' as an example. What we need to know is the whole string of numbers and letters beginning with 70xxCxx-xxxx_xxxxx. To exit the test, record your numbers and then click the return arrow. Capture a screenshot of your screen and send me a private message while we're talking.
-

-
Something akin to this, then...
-
Ok , many thanks👌
-
Thank you very much
-
-
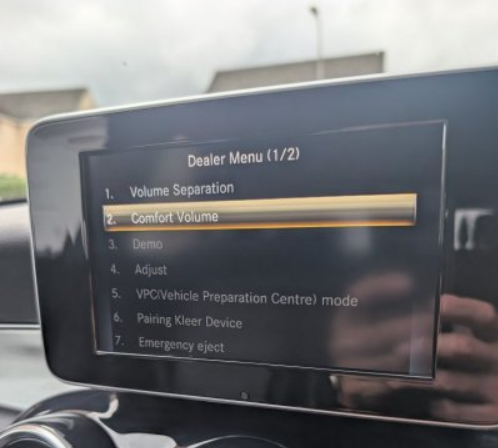
Greetings to everyone. Could someone elucidate the functions of the choices in the accompanying dealer menu, please?
-
I do so every four to five days.
-
The length of the dipstick is irrelevant; the black triangle at the top of the dipstick's plastic part encounters a limit above the gearbox sump, enabling the black measuring section to ascertain the fluid level from above. It is customary for a significant portion of the dipstick to protrude from the dipstick tube inside the engine compartment. The ATF level is assessed while the engine is running, in park, on a flat surface, after a 30-minute drive when heated.
-
In this case, I believe you cannot disable the traction control. However, I am elderly and may be mistaken, amusingly.
-
2007 BMW 123d fuel overflow pipes
norbury.brook replied to norbury.brook's topic in General Car Chat
Thank you, please inform me. -
2007 BMW 123d fuel overflow pipes
norbury.brook replied to norbury.brook's topic in General Car Chat
Strangely, realoem does not display the T-piece present in my vehicle, marking the single instance of inaccuracy I have encountered with realoem. The image above depicts the T-piece branching just after the yellowish pipe. -
2007 BMW 123d fuel overflow pipes
norbury.brook replied to norbury.brook's topic in General Car Chat
I examined the pipe, and regrettably, it is incorrect. The pipe I require is unavailable for purchase, which is frustrating. I will attempt to create one, given it is situated on the lower pressure side of the system and should not leak readily. -
Detached the T-piece connecting the gasoline overflow to the fuel feed pipes (see to images). Does anyone possess a spare item available for purchase? In urgent need of it and unable to locate one anyplace. Part number 13537800666 (7800666) Thank you!
-
https://www.ebay.co.uk/itm/145611375069?mkevt=1&mkcid=1&mkrid=710-53481-19255-0&campid=5338181125&toolid=10001&customid=2518X1570512X0488ac4254efaa583d254fa5bf43ca94
-
2016 W213 E-Class microphone is very silent.
norbury.brook replied to norbury.brook's topic in General Car Chat
Proceeding to the second round: I acquired a second-hand, genuine microphone from eBay, which came yesterday. With the sun shining, I seized the opportunity to replace the microphone; however, the space is somewhat limited. Procedure: Detach the vanity light Sever Eliminate Gently remove the microphone cover by applying pressure from the rear to slightly detach it from the headliner, then detach the cover. As previously said, it will escape into the netherworld if given the opportunity, hence it should be covered. The microphone is secured with an exceptionally adhesive backing. I used a plastic trim remover to insert it slightly, while simultaneously placing two fingers into the aperture left by the vanity mirror and rolling upward from the base. Continue manipulating the tape/cover until the microphone detaches. It takes time, but it ultimately becomes available. Carefully extract the microphone via the aperture and unplug it. Ensure that you have detached the lid and the paper/filter component from the new microphone. Reinsert and secure it in the opening. Align it properly and use some of the adhesive if possible (I succeeded in tucking it below). Reattach the cover, reconnect, and reinstall the vanity light. Bob is your aunt or a similar relative. It seems that my problem may have been resolved, as two individuals have informed me that the call was "significantly improved." I am optimistic. I hope my instruction will assist others; it took around 25 minutes and cost £20 for the component, making it a worthwhile effort. -
2016 W213 E-Class microphone is very silent.
norbury.brook replied to norbury.brook's topic in General Car Chat
The update seems to have improved the situation; nonetheless, clarity remains inconsistent, which is annoying. Considering that the issue affects both sides, I believe a microphone replacement may not resolve the problem. Has no one else had this problem? -
2016 W213 E-Class microphone is very silent.
norbury.brook replied to norbury.brook's topic in General Car Chat
After receiving many suggestions and conversing with Mark at Command Online, he verified that the objects I was examining were, in fact, the microphones located in the headliner over the sun visors. Provided me with many troubleshooting recommendations to assist me in my endeavours. Exceptional service and counsel, since he could have simply said, "we cannot assist unless you are willing to visit," instead he generously invested time in addressing my enquiries! To access the rear of the microphone, remove the vanity mirror light, then apply pressure from both the front and back to elevate the little grille enough for fingernail insertion. Loosen the grill carefully and gradually, as it may detach and become irretrievable; ensure that your door is closed! Initially, inspect the grill for a rubber bung; extract it using a pin and pry it out from both sides. Clean it, then examine the grill for a tiny plastic filter and shake it out. Insert your finger into the rear of the microphone body, use your thumb to grip the front grill, and snap it back into place. Perform the same procedure on the passenger side. Test call, very clear once again. It is evident that a change has occurred, however this resolves the issue and restores proper functionality. I already adjusted the Transmission volume in the menu, and when testing it again during the call, it was accurate. Joyful days. -
2016 W213 E-Class microphone is very silent.
norbury.brook replied to norbury.brook's topic in General Car Chat
I have examined the dome; it seems to be clear and pristine on all sides, with no obstructions present. Bottom I must use it as well. I will need to check for a removal video. -
2016 W213 E-Class microphone is very silent.
norbury.brook replied to norbury.brook's topic in General Car Chat
I will attempt that; is it located near the sun visor? Is it a little circular one or is it located in the central light dome? -
Greetings, everyone. Collected the vehicle yesterday; everything is OK, and I am enjoying the driving experience, with several aspects to navigate! Nonetheless, it presents a singular challenge... Initiate an outbound call, either by standard Bluetooth or via Android Auto, and the other party is unable to hear me? The volumes seem to be elevated in the menus, and the audio is transmitted clearly; nonetheless, it is characterised by a muffled quality, interspersed with brief moments of clarity lasting a second or two, before reverting to muffled sound. When I gently rotate my head, they are unable to hear me whatsoever. I suspect this is a microphone issue; but, I saw some comments about a software update on Command that individuals said may have created a problem. Does anybody have any solutions before I return to the dealership? Has anybody else had this issue and resolved it?
-
I activated the button - New F31 owner (to me)
norbury.brook replied to Treeri's topic in General Car Chat
I presume rear-wheel drive? The transfer box oil also need servicing.Tyres are a critical consideration if it is an xDrive vehicle.Although you do not mention it, enjoy the vehicle; I had an R31 330d xDrive for 18 months, and my nephew now has it.